 Save
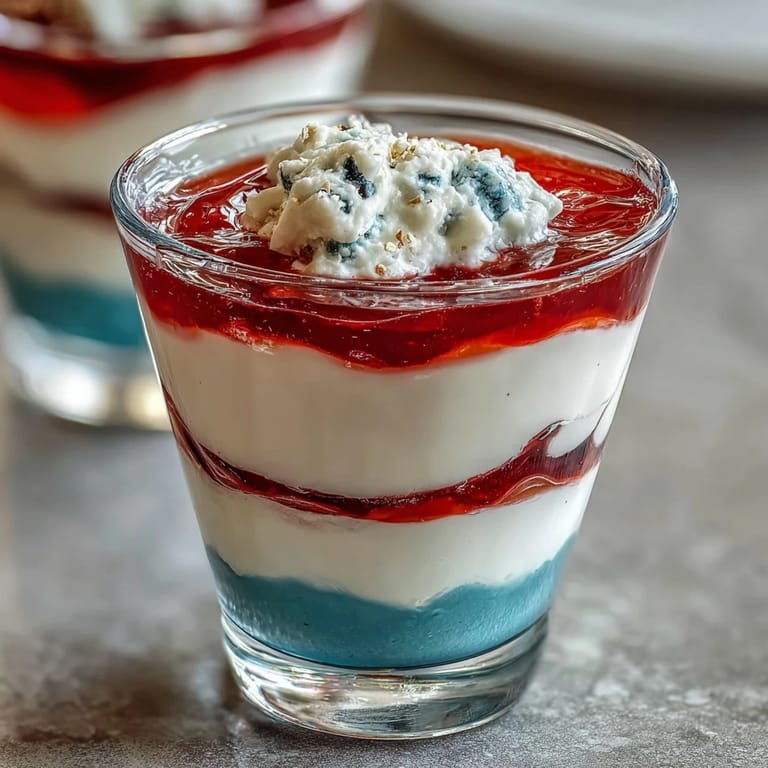
Save My nephew asked me to make something that looked like fireworks in a cup, and I honestly had no idea what he meant until he pulled up a photo of these layered Jello cups on his phone. There's something about watching a kid's face light up when dessert arrives looking like edible patriotic art that changes how you think about cooking. That afternoon, I discovered that patience with gelatin—letting each layer set properly—is what separates a muddy mess from something genuinely beautiful. Now every Fourth of July, these cups show up on our table without fail.
I made these for a potluck once and kept them in a cooler that wasn't quite cold enough—the middle white layer started sweating and the whole thing turned into a delicious but visually tragic puddle by the time we arrived. Now I'm obsessive about temperature control, which honestly made me a better baker overall. Sometimes your biggest kitchen failures teach you the most practical lessons.
Ingredients
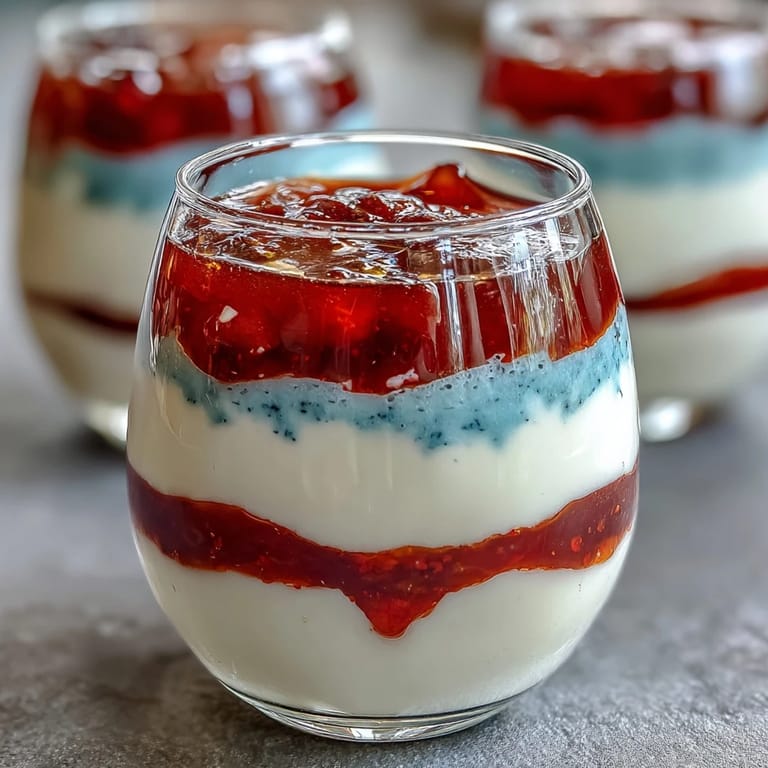
- Strawberry or cherry flavored Jello (3 oz box): The red layer foundation—grab whichever flavor you actually like since you'll be tasting it, and don't get the diet version unless you love the aftertaste.
- Boiling water: Hot water dissolves gelatin completely; skipping the heat means grainy, sad Jello.
- Cold water: This cools things down and helps you control the setting speed without creating a rubbery texture.
- Unflavored gelatin (1 envelope): This is the secret to that creamy white layer—it gives you control that flavored Jello doesn't offer.
- Sweetened condensed milk: It's rich and opaque, making that middle stripe actually white instead of see-through like regular milk would.
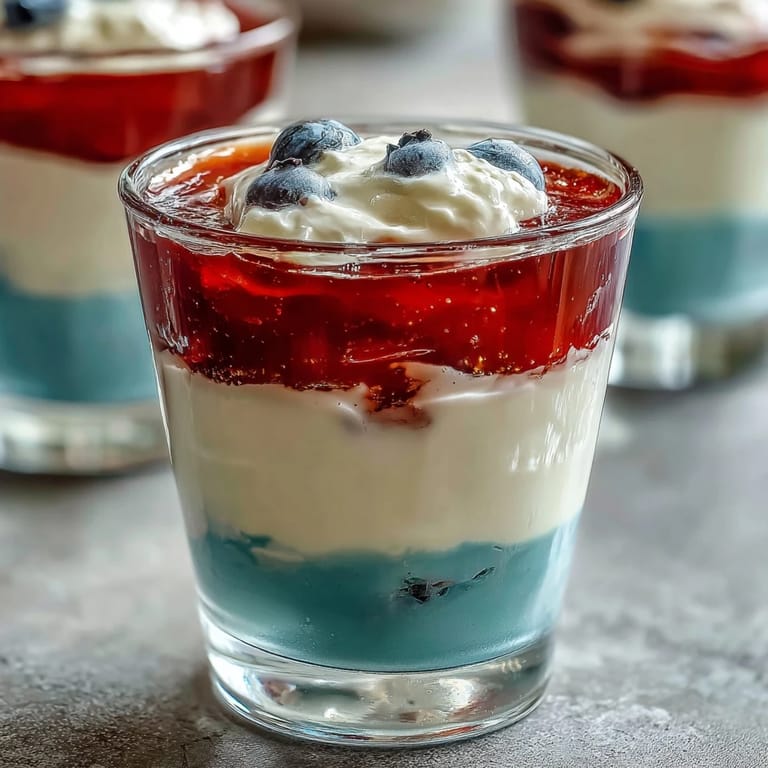
- Blue raspberry flavored Jello (3 oz box): The top layer—blue raspberry is the most reliably vibrant color I've found.
- Whipped cream and fresh berries (optional): These make the whole thing feel celebratory and add a textural contrast that elevates it from plain to special.
Tired of Takeout? 🥡
Get 10 meals you can make faster than delivery arrives. Seriously.
One email. No spam. Unsubscribe anytime.
Instructions
- Set up your stage:
- Line eight clear cups upright where they'll stay undisturbed—this is your production line and moving them around mid-process is how things go sideways. If you have a muffin tin, grab it now because you'll use it soon.
- Build the red foundation:
- Stir the strawberry Jello into boiling water until every last granule dissolves, then add cold water to cool it down slightly. Divide this evenly between cups (about two tablespoons each) and angle them in the muffin tin so they set at a slant—this creates a prettier layered effect than straight-sided cups.
- Let patience do the work:
- Refrigerate for forty-five to sixty minutes until the red layer is completely set and jiggles as one solid mass when you gently shake a cup. Don't rush this or the next layer will sink through like it owns the place.
- Create the creamy middle:
- Sprinkle unflavored gelatin over cold water and let it sit for five minutes—this blooming step is crucial and non-negotiable. Pour boiling water over it, stir until completely dissolved, then whisk in the sweetened condensed milk and let it cool to room temperature (or it'll melt your red layer).
- Layer number two:
- Once the red is firm, set your cups upright and carefully pour the white mixture down the inside of each cup until you've added about two tablespoons—pour slowly so it settles gently on top without breaking through. Refrigerate again for forty-five to sixty minutes.
- Top with blue:
- Dissolve the blue Jello in boiling water, stir in cold water, and let it cool to room temperature so it doesn't disturb the white layer. Pour gently over the white layer until each cup has about two tablespoons of blue.
- The final chill:
- Let everything set for at least two hours, though overnight is actually better if your schedule allows. You'll know it's ready when there's no wobble in the blue layer and the whole cup feels solid.
 Save
Save There was a moment at my nephew's birthday party when he showed all his friends the cups before eating them, holding them up to the light like they were treasures. That's when I realized it's not just about the taste—it's about the story you create when something looks special enough to photograph. Food that delights the eye before it touches the tongue hits different.
The Angled Chilling Trick
Using a muffin tin to angle the cups while the red layer sets creates a slanted surface that looks more visually interesting than a flat top—the layers catch light differently and it just feels intentional. I've made these with cups sitting straight and they're fine, but the angled version gets noticed more. It's a small detail that takes zero extra effort and makes people think you're some kind of Jello wizard.
Temperature Control Matters
The biggest mistake I see people make is pouring layers that are too warm, which melts whatever's underneath and creates brown mush instead of stripes. All your liquid mixtures should be at room temperature before they hit the cup—let them sit for a few minutes after mixing if you're in a rush. Cold ingredients are fine too, they just set faster and can make layering trickier timing-wise.
Customization and Serving
Swap the flavors around based on what you actually like eating and what colors you're going for—strawberry, cherry, lime, and lemon all work beautifully. The condensed milk layer stays white regardless, so really the fun is in choosing your Jello colors.
- Top with whipped cream right before serving so it doesn't get weepy and sad sitting on top for hours.
- Fresh berries make it look intentional and add a nice contrast to the gel texture.
- These keep covered in the fridge for up to five days, so you can make them ahead without stress.
 Save
Save These cups have become my go-to for any celebration where I want something that looks like effort without actually requiring much of it. They're the kind of dessert that makes people happy before they even taste them.
Recipe FAQ
- → How do I ensure clean, distinct layers?
Allow each gelatin layer to fully set in the refrigerator before adding the next. Pour gently to avoid mixing layers.
- → Can I substitute the sweetened condensed milk?
Yes, for a dairy-free version, coconut milk combined with sugar can replace the sweetened condensed milk in the white layer.
- → What flavors are recommended for the red and blue layers?
Strawberry or cherry works well for the red layer, while blue raspberry is ideal for the blue layer to achieve vibrant colors.
- → Is it necessary to chill the cups at an angle for the first layer?
Angled chilling helps create an appealing striped pattern by setting the first layer diagonally. Use a muffin tin or similar tool to hold cups tilted.
- → How long should the full dessert be chilled before serving?
After setting all layers, refrigerate upright for at least 2 hours to ensure complete firmness and stability.