 Save
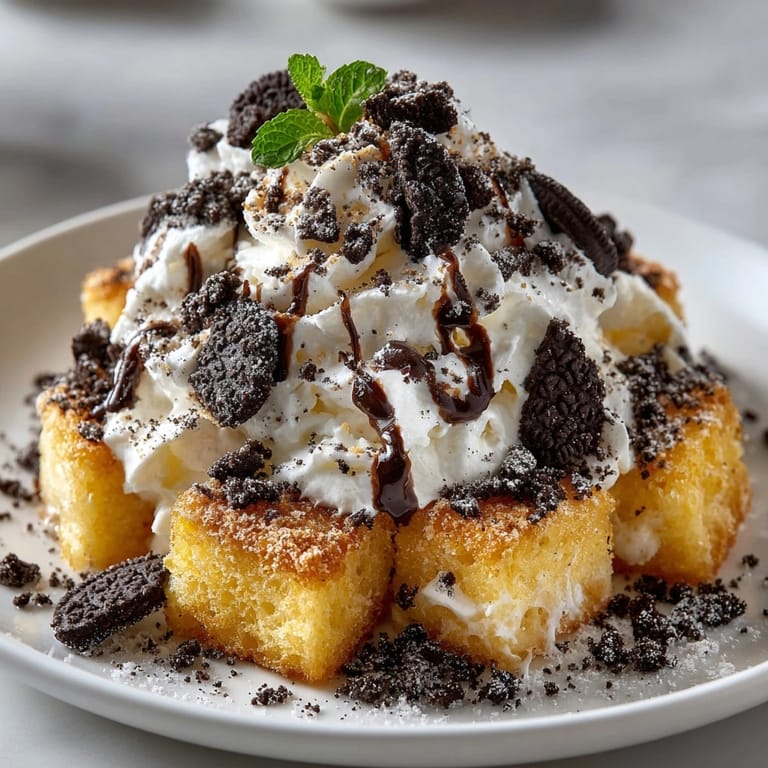
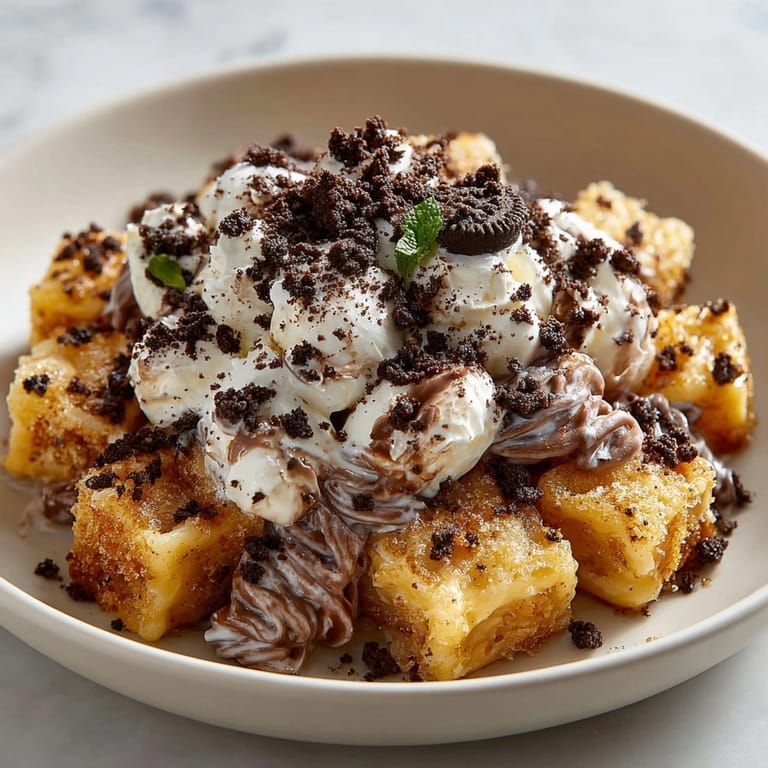
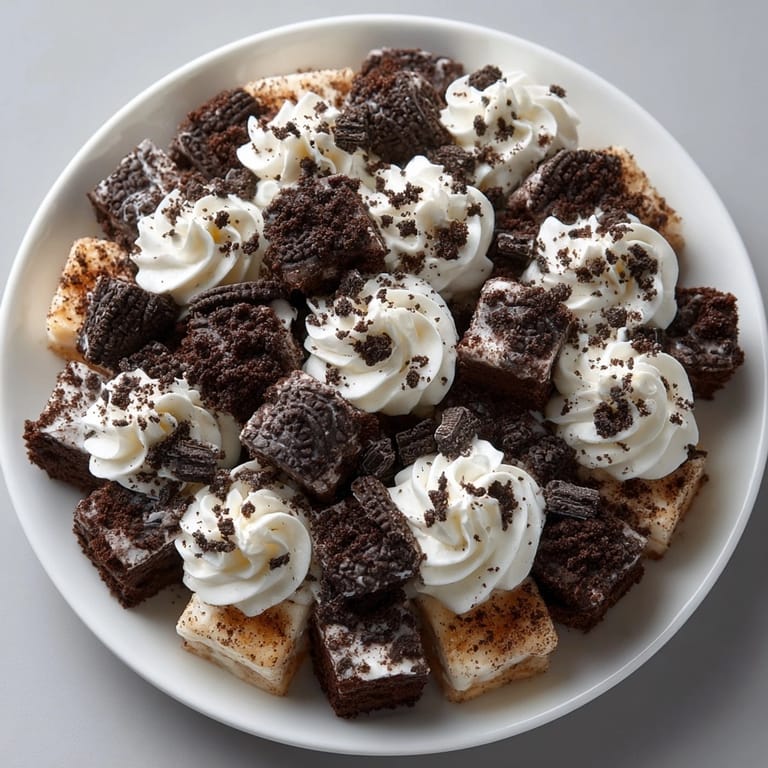
Save This indulgent Chaos Cake Oreo Crumb Pasta Dessert transforms traditional dessert elements into a playful, whimsical treat that will surprise your guests. The unexpected combination of cake, chocolate pasta, cream, and Oreo crumbs creates layers of texture and flavor that somehow work perfectly together despite their chaotic assembly.
I first created this dessert for my daughter's "upside-down" themed birthday party, and it was such a hit that it's now requested for special occasions. The chocolate pasta always gets people talking, and the playful presentation makes everyone smile before they even take a bite.
Ingredients
- All purpose flour: forms the base for both the cake and chocolate pasta, providing structure while keeping the dessert light
- Cocoa powder: gives the pasta its rich chocolate flavor and dramatic color against the cream
- Heavy whipping cream: whipped to stiff peaks creates a luxurious layer that balances the textures
- Oreo cookies: crushed into crumbs add essential crunch and that beloved cookies and cream flavor
- Vanilla extract: enhances all the other flavors while adding warmth to both the cake and cream layers
- Unsalted butter: makes the cake tender and flavorful while allowing you to control the salt content
Tired of Takeout? 🥡
Get 10 meals you can make faster than delivery arrives. Seriously.
One email. No spam. Unsubscribe anytime.
Instructions
- Prepare the cake base:
- Mix the butter and sugar until light and fluffy, about 3 minutes with an electric mixer. Add eggs one at a time, ensuring each is fully incorporated before adding the next. The mixture should be smooth and pale. Add vanilla and mix briefly. In a separate bowl, combine flour, baking powder, and salt. Add this dry mixture to the wet ingredients alternating with milk, beginning and ending with the dry ingredients. Pour into a prepared pan and bake until a toothpick comes out clean, about 20 minutes. The cake should be golden on top and slightly pulling away from the sides of the pan.
- Create chocolate pasta:
- Combine dry ingredients in a bowl and form a well in the center. Add the egg and oil to the well and gradually incorporate the surrounding flour mixture. Add water a tablespoon at a time until the dough comes together but isn't sticky. Knead for about 5 minutes until smooth and elastic. This develops the gluten for proper pasta texture. Wrap in plastic and let rest so the gluten relaxes, making it easier to roll out. Roll the dough as thin as possible on a floured surface and cut into thin strips. The thinner your pasta, the more delicate and faster cooking it will be.
- Cook the chocolate pasta:
- Bring a large pot of water to a rolling boil. Add the pasta strips and cook for 2 to 3 minutes until they float and are tender but still have some bite. Immediately drain and rinse under cold water to stop the cooking process and prevent sticking. Toss with a tiny bit of oil if not using right away.
- Whip the cream layer:
- In a chilled bowl, whip heavy cream until it begins to thicken. Add powdered sugar and vanilla extract and continue whipping until stiff peaks form when you lift the beater. Be careful not to overwhip or it will become buttery. The cream should be thick enough to hold its shape but still smooth and spreadable.
- Assemble the dessert:
- Cut the cooled cake into approximately 1 inch cubes. In clear glasses or bowls, begin layering cake cubes, chocolate pasta strands, and whipped cream. Sprinkle generously with Oreo crumbs between layers. Create at least two complete layers, ending with cream and a heavy sprinkle of Oreo crumbs on top. The assembly should look intentionally messy for the chaos effect. Refrigerate for at least 30 minutes before serving to allow flavors to meld.
 Save
Save The chocolate pasta is truly the star of this dessert. I was skeptical when I first tried making it, but the subtle cocoa flavor and unique texture create something magical when combined with the sweet cake and cream. My favorite moment is watching guests try to figure out what the chocolate strands are before taking their first bite.
Make-Ahead Tips
The chocolate pasta can be made up to 2 days ahead and stored in an airtight container with a light dusting of flour to prevent sticking. The cake can be baked a day in advance and kept covered at room temperature. For best results, whip the cream fresh before assembly, though the entire assembled dessert can be refrigerated for up to 4 hours before serving.
Creative Variations
The beauty of this chaos dessert is its adaptability. Try using chocolate cake instead of vanilla, or substitute the chocolate pasta with store bought chocolate pappardelle to save time. For a fruity twist, add layers of macerated strawberries or raspberries between the cake and cream. You could even transform this into a mocha version by adding espresso powder to the whipped cream and using coffee-flavored Oreos for the crumb layer.
Serving Suggestions
For an elegant presentation, serve in martini glasses or clear tumblers to showcase the beautiful layers. Add a chocolate garnish by melting dark chocolate and drizzling it over the top just before serving. This dessert pairs wonderfully with a shot of espresso, a glass of dessert wine like Moscato, or even a scoop of vanilla ice cream on the side for those who want to take the indulgence even further.
Troubleshooting Common Issues
If your chocolate pasta dough seems too dry, add water just a teaspoon at a time until it comes together. Too wet and it will stick to your work surface and be impossible to cut cleanly. If your whipped cream begins to weep or separate after assembly, you likely overwhipped it. In the future, stop whipping as soon as stiff peaks form. For make ahead assembly, consider stabilizing your whipped cream with a tablespoon of mascarpone cheese or cream cheese.
 Save
Save Helpful Notes
For the most dramatic presentation, use tall clear glasses to showcase all the chaotic layers. The chocolate pasta can be made with a pasta machine if you have one, creating even more uniform noodles. Letting the dessert rest in the refrigerator improves the flavor as the cake slightly absorbs the moisture from the cream.
This dessert is a delightful conversation starter, bringing smiles and sweet satisfaction to any gathering. Embrace the delicious chaos and enjoy every bite!
Recipe FAQ
- → How is the chocolate pasta made?
The chocolate pasta is prepared by mixing flour, cocoa powder, sugar, and salt with egg and oil, then kneading into a dough. After resting, it's rolled thin, cut into strips, and boiled briefly until tender.
- → Can I substitute store-bought pasta?
Yes, chocolate pappardelle or other chocolate-flavored noodles can be used in place of homemade pasta for convenience.
- → What type of cream is best for layering?
Heavy whipping cream whipped with powdered sugar and vanilla creates a soft, airy layer that complements the dessert's richness.
- → Are Oreo crumbs necessary as a topping?
Oreo crumbs add crucial texture and chocolate flavor, but you may substitute with other chocolate cookies or skip them for a simpler finish.
- → How should leftovers be stored?
Store assembled portions covered in the refrigerator for up to two days to maintain freshness and texture.
- → Can this dessert be made vegan?
With plant-based substitutes for eggs, butter, milk, and cream, and vegan cookies, this can be adapted for vegans.