 Save
Save I still remember the winter my grandmother taught me to build a gingerbread house frame, not as a complicated architect's project, but as something warm and welcoming that would become the heart of our holiday table. She showed me how the spiced dough could transform into sturdy panels that, when held together with royal icing, created this magical edible border around our favorite treats. That first year, our frame wasn't perfect—some pieces tilted slightly, the icing dripped in unexpected places—but it became the most cherished centerpiece we'd ever made together.
I'll never forget my neighbor's face when she saw our gingerbread frame standing proudly on the dining table, holding court over an arrangement of festive cookies and treats. She asked if I'd bought it from a fancy bakery. When I told her I'd made it, she insisted on coming back every holiday season just to see what new design we'd create. That's when I realized this wasn't just a recipe—it was an invitation to make memories.
Ingredients
- All-purpose flour (300 g): The foundation of everything—this is what gives your house its structure and substance, so don't skip the measuring. I've learned that scooping directly from the bag compacts it too much; spoon and level instead for the most reliable dough
- Brown sugar (100 g): This brings warmth and moisture that white sugar can't quite capture. It makes the dough slightly chewier, which means your finished panels hold together beautifully without cracking
- Unsalted butter (100 g), softened: Cold butter will fight you during mixing. Let it sit on the counter for 20 minutes—you want it so soft it yields to a gentle press from your finger
- Molasses or dark honey (100 g): This is the soul of gingerbread. The deeper, more complex sweetness makes people pause mid-bite and ask what that mysterious flavor is
- Large egg (1): This binds everything and creates the dough's elasticity. Room temperature is truly important here—cold eggs don't incorporate smoothly
- Ground ginger (1 tsp): Fresh ginger root can't replicate this warmth. This is where the comfort comes from in every piece
- Ground cinnamon (1 tsp): It bridges ginger and cloves, keeping them from getting too sharp. A little goes a long way, so measure carefully
- Ground cloves (½ tsp): These are bold and spicy—respect their power by not doubling them. Half a teaspoon is exactly where the magic sits
- Baking soda (½ tsp): This gentle leavening makes the dough rise just enough to be tender, but your panels stay flat and sturdy for building
- Salt (¼ tsp): Even in sweet doughs, salt wakes up all the spice flavors and prevents the sweetness from becoming cloying
- Egg white (1): For the royal icing—this needs to be at room temperature and completely free of any yolk, or it won't reach those glossy peaks
- Powdered sugar (200 g), sifted: Sifting isn't fussy, it's kind. Lumpy powdered sugar creates streaky icing that won't hold your house together
- Lemon juice (½ tsp): Just enough acid to stabilize the icing without making it taste citrusy. Fresh lemon works best
- White chocolate (50 g), melted: For drizzles that create those elegant accents—it softens slightly in the warmth of your kitchen, so melt it gently over warm water, never direct heat
- Assorted candies (white and brown): Chocolate buttons, white sprinkles, mini marshmallows—choose what makes your heart happy. They're what transform a structure into a home
- Edible glitter or silver pearls (optional): Just a whisper of sparkle changes everything. I learned to go easy on these; a little dust of magic is better than overdone glamour
Tired of Takeout? 🥡
Get 10 meals you can make faster than delivery arrives. Seriously.
One email. No spam. Unsubscribe anytime.
Instructions
- Prepare your base:
- Start by creaming the softened butter and brown sugar together in a large bowl. Use an electric mixer if you have one—you're looking for that moment when the mixture becomes pale and fluffy, almost like clouds. This takes about 2-3 minutes, and you'll know it's right when it looks lighter than when you started and holds soft peaks when you lift the beaters. This creaming step is what keeps your dough tender.
- Bring it together:
- Add your egg and molasses to the creamed mixture, stirring until everything is fully combined. The batter will look rich and glossy, and you might notice how the molasses darkens everything into that deep brown you want. Don't skip the mixing here—you need the egg fully incorporated or you'll have streaky dough.
- Combine your spices:
- In a separate bowl, whisk together your flour, ginger, cinnamon, cloves, baking soda, and salt. This is where all the warmth lives. By whisking it together first, you're distributing the spices evenly so every bite tastes balanced. Lift your whisk up high as you stir—it aerates the flour and makes the final dough lighter.
- Unite wet and dry:
- Gradually pour the dry mixture into your wet ingredients, stirring as you go. Don't dump it all at once or you'll have flour clouds everywhere. Stir until a smooth, cohesive dough forms—it should feel slightly tacky but hold together. This is the moment the transformation happens.
- Let it rest:
- Wrap your dough tightly in plastic wrap and refrigerate for at least 30 minutes. I often do this the night before. Cold dough is forgiving dough—it won't stick to your rolling pin, and it will hold its shape beautifully when you cut those house pieces.
- Heat your oven:
- Preheat to 180°C (350°F) and line a baking sheet with parchment paper. I position my racks in the center of the oven to ensure even baking. Give the oven a full 15 minutes to truly reach temperature.
- Roll with intention:
- On a lightly floured surface, roll your dough to about 5 mm thickness. This thickness is crucial—too thin and your pieces will be fragile; too thick and they won't bake through. Use a ruler if you need to. It helps to rotate the dough as you roll, keeping it even.
- Cut your house shape:
- Using templates or a knife, carefully cut out your house panels—front, back, sides, and roof pieces, each about 10-12 cm. I use cardboard templates that I've saved from year to year. Place the pieces on your prepared baking sheet, spacing them about an inch apart.
- Bake until golden:
- Bake for 10-12 minutes. You're looking for the edges to become firm and slightly darker, while the centers remain tender. Don't overbake or your panels will be hard and brittle. The edges will feel almost crispy, but the centers should have the slightest give when warm.
- Cool completely:
- Transfer your pieces to a wire rack and let them cool completely. This is important—if you try to assemble warm panels, they'll warp and bend. I usually bake a day ahead and store everything airtight, which also makes the dough slightly crispier, better for building.
- Create your glue:
- To make the royal icing, beat one egg white until soft peaks form—this means when you lift the beaters, the peaks gently fold over. Gradually add your sifted powdered sugar, a handful at a time, beating well between additions. Add the lemon juice. You're looking for thick and glossy, like meringue. This takes patience, but it's what holds your house together.
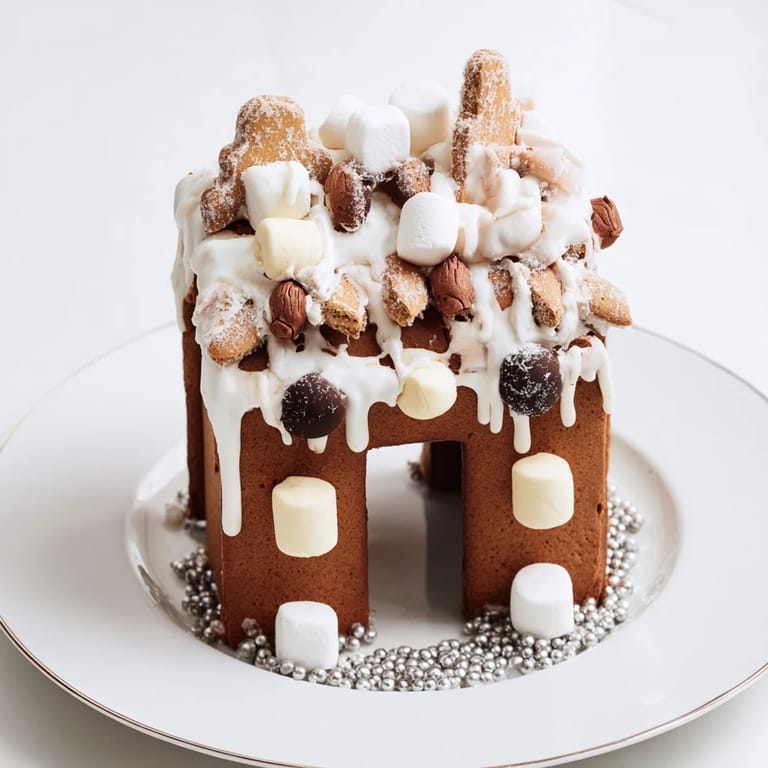
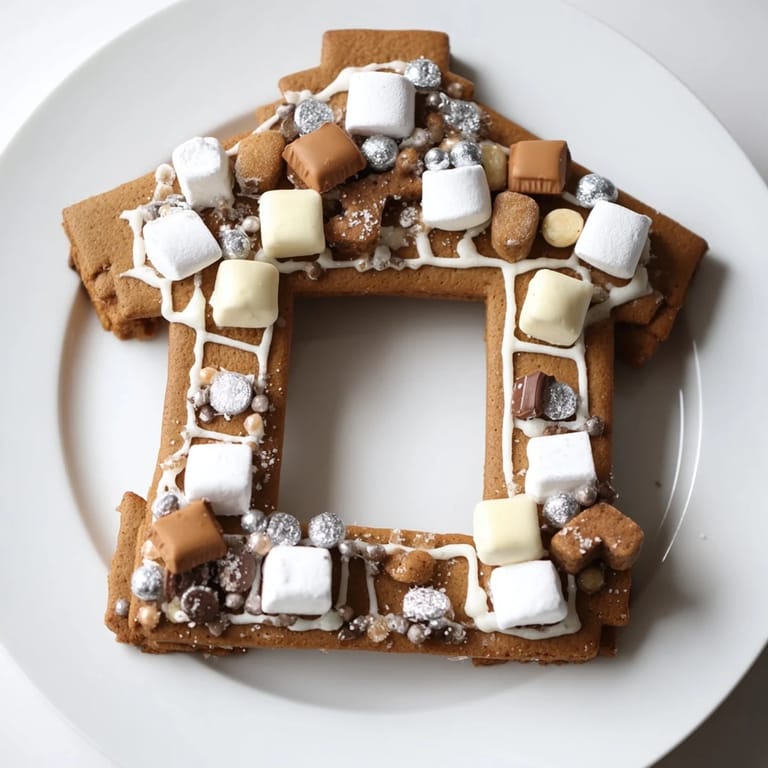
- Build your frame:
- This is the delicate part. Use royal icing as your mortar, piping a generous bead along the edges where panels will meet. Attach the front and back to the sides first, holding each connection for a few seconds as the icing grabs slightly. Then attach your roof pieces. Let everything set for at least 30 minutes—this is a good time to have some tea.
- Decorate with joy:
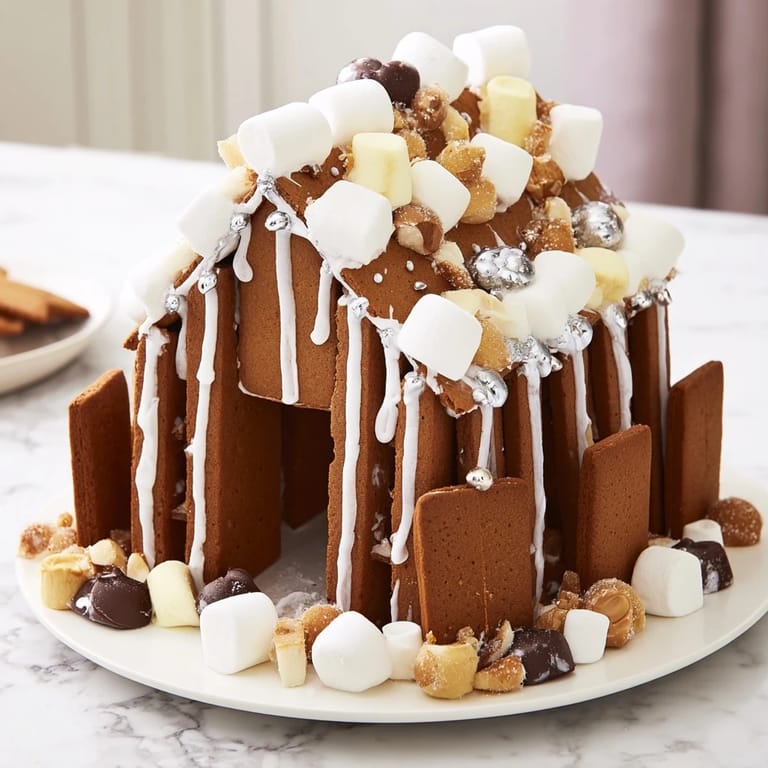
- Once the structure is set, brush on white chocolate drizzles, stick on candies with small dabs of icing, and sprinkle with whatever makes you happy. This is where your frame becomes uniquely yours. Stand back and look at it—you built this.
- Complete the picture:
- Place your finished frame on a platter and arrange additional cookies, nuts, and holiday treats around it. This final arrangement is what transforms your frame from a structure into a centerpiece. Let it do what it was meant to do—frame the things you love.
 Save
Save The year my daughter took over decorating the frame, she used every candy in the house—some neat, some wild—and suddenly it wasn't about perfection anymore. It was about her creative vision, her joy expressed in sprinkles and marshmallows. That's when I understood that a gingerbread house frame isn't architecture; it's a canvas for love.
The Art of Assembly
Building your gingerbread frame is a bit like poetry—there's a structure, but there's also room for your voice. Start with the sturdiest panels as your base, and work upward with intention. The royal icing sets quickly but not instantly, which gives you a brief window to adjust anything that's slightly off. I've learned to pipe a generous bead of icing on each connection point, and then hold the pieces steady for just long enough to feel them grab. It's not a race. Some of my favorite frames took hours to assemble, but the time transforms the experience from cooking into something more like meditation.
Decorating Like a Designer
The decoration stage is where your frame tells its own story. Think of the royal icing as your paintbrush and the candies as your palette. White chocolate drizzles create elegant definition between sections, while candies add warmth and personality. I've discovered that clustering similar candies in groups looks more intentional than scattering them randomly. And that moment when you step back and see the whole thing come together—that's worth every bit of the effort. Let the edible glitter be your final whisper of magic, not your main statement.
From Kitchen to Table
Your gingerbread frame isn't meant to live in a box—it's meant to live on a platter, surrounded by the treats it cradles. The cookies, the nuts, the little luxuries you've gathered create a landscape of holiday joy. This is the moment when your creation becomes a portal to something larger than a recipe. It becomes a gathering place, a conversation starter, a memory in the making.
- Place your frame on a cake platter or large board so it has breathing room
- Arrange cookies and treats around it with intention, creating a welcoming landscape
- Light a candle nearby—cinnamon or vanilla—to complete the sensory experience
 Save
Save This gingerbread frame is your invitation to slow down, to build something beautiful with your hands, and to create a moment your loved ones will remember. Every spice, every candy, every shared laugh in the kitchen becomes part of the edible art you're offering to the world.
Recipe FAQ
- → How do I ensure the panels are sturdy?
Bake the gingerbread panels thoroughly until edges firm up, and consider baking them a day ahead to fully harden before assembly.
- → What can I use instead of royal icing for assembly?
For alternatives, try a vegan icing made with powdered sugar and plant-based liquids or edible glue designed for decorations.
- → Can I add cocoa powder to the dough?
Yes, incorporating cocoa powder deepens the dough's color and adds a subtle chocolate note to the frame.
- → How long should the assembled frame dry?
Allow the assembled frame to dry for at least 30 minutes to ensure panels are securely bonded before decorating.
- → What decorations work best for this house frame?
Use white chocolate drizzles, assorted white and brown candies, sprinkles, and optional edible glitter or silver pearls for a festive touch.