 Save
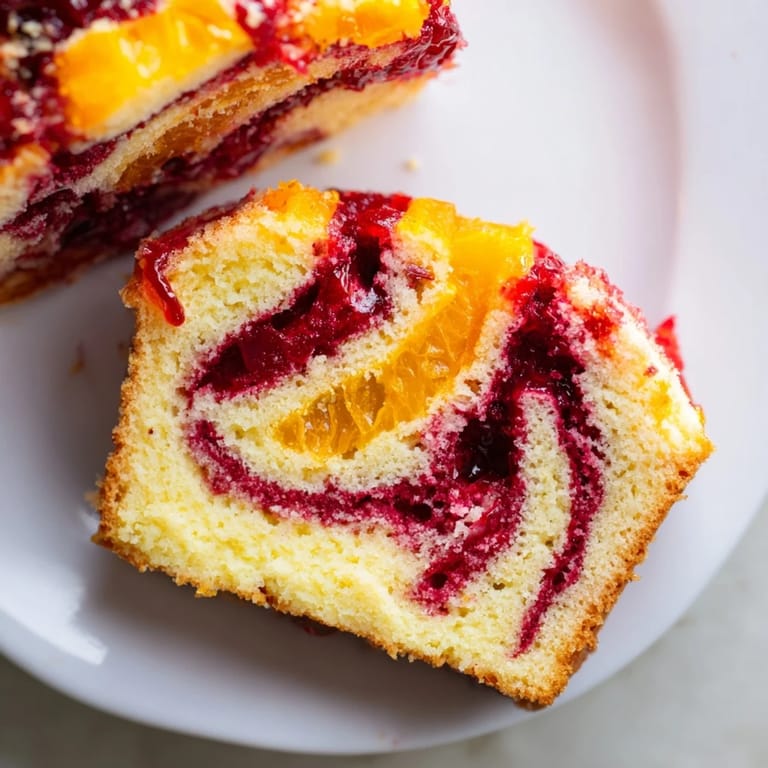
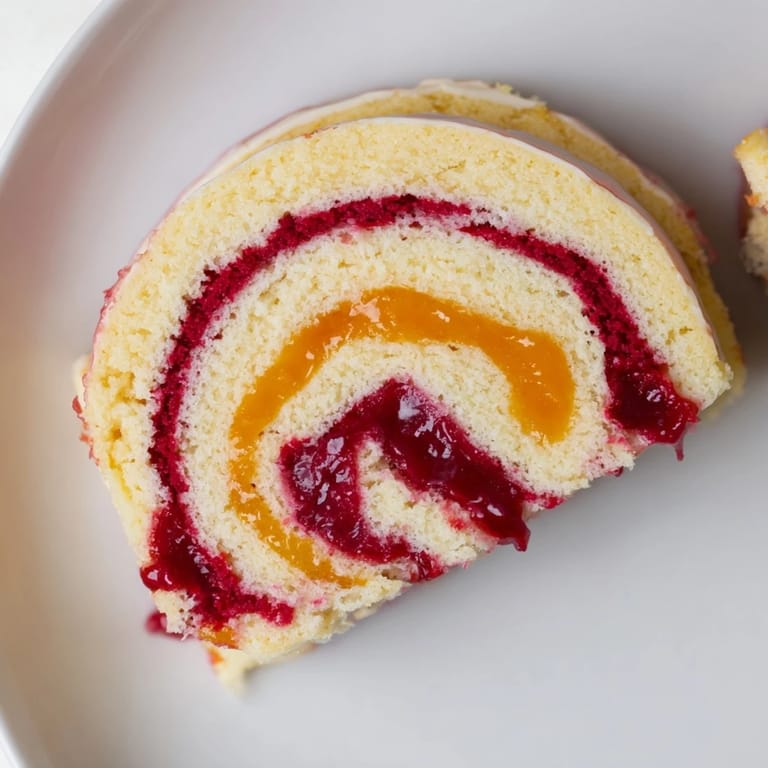
Save I'll never forget the December morning I decided to bring something unexpected to my family's holiday table. While everyone else was planning traditional desserts, I was captivated by a vision of deep cranberry red and bright orange swirling together in a single cake—colors that felt like the season itself. That first attempt at the Cranberry Orange Swirl taught me that sometimes the most memorable desserts are born from wanting to create something that looks as beautiful as it tastes.
I baked this cake for my neighbors on New Year's Eve, and watching their faces light up when they saw the spiral pattern is a moment I still smile about. My nine-year-old helped me swirl the colors that day, and she declared it was 'the most beautiful cake that ever existed.' It became our tradition after that.
Ingredients
- Fresh or frozen cranberries (1½ cups): These tart gems are the soul of this cake, creating that vibrant deep red swirl. I learned the hard way that frozen cranberries work beautifully and sometimes even better than fresh because they break down more evenly—just don't thaw them first.
- Granulated sugar (for swirls and batter): Sugar doesn't just sweeten here; it draws out the cranberry juices and helps create that glossy, jam-like texture that photographs so gorgeously.
- Water (2 tbsp): This modest amount keeps the cranberries from sticking to the pan while they cook down into deep, jammy richness.
- Orange zest and freshly squeezed orange juice: This is where the magic happens—organic oranges give you the brightest, most vibrant flavor. I always zest first, then juice, and the aroma alone is worth the extra effort. That citrusy brightness cuts through the richness and prevents the cake from feeling heavy.
- Cornstarch (1 tbsp): This little helper thickens the orange mixture to the perfect curd-like consistency so your swirl stays defined and doesn't bleed into the cake batter during baking.
- All-purpose flour (2 cups): The foundation of your cake; measure by spooning and leveling for accuracy, or weigh if you have a scale.
- Baking powder and baking soda: These work together to give you that tender crumb and gentle rise—too much and your cake becomes cakey, too little and it's dense.
- Fine sea salt (½ tsp): Just enough to make everything taste more like itself without any salty flavor.
- Unsalted butter (½ cup), softened: Room temperature butter creams beautifully and incorporates air, giving you that feathery soft crumb. Cold butter is the enemy here.
- Eggs at room temperature: Cold eggs don't emulsify properly with the butter, and you'll end up with a less fluffy batter. Let them sit out for 20 minutes if you forget.
- Pure vanilla extract: Just a teaspoon, but it rounds out all those bright citrus notes and makes everything feel warmer and more complete.
- Whole milk at room temperature: This creates moisture and tenderness. Cold milk will shock the warm batter and prevent proper mixing.
Tired of Takeout? 🥡
Get 10 meals you can make faster than delivery arrives. Seriously.
One email. No spam. Unsubscribe anytime.
Instructions
- Make the cranberry swirl first:
- Pour your cranberries, sugar, and water into a small saucepan and set it over medium heat. Stir gently and wait for that magical moment when the berries start popping—you'll hear little bursts, almost like the sound of tiny fireworks. Watch as the mixture transforms from pale to deep crimson. After about 7–10 minutes, when most berries have split, grab a wooden spoon and mash them against the pan's side, breaking them into a thick, jam-like consistency. Stir in your orange zest, then let it cook for another 3–5 minutes until the mixture looks glossy and glossy, thick enough to leave a trail when you drag your spoon across the bottom. You're looking for something that clings to the spoon rather than running off. Spread it on a plate to cool completely while you work on the next steps—this is crucial because warm fruit puree will bleed into your batter.
- Create the orange swirl:
- In another small saucepan, whisk together your freshly squeezed orange juice, sugar, orange zest, and cornstarch until the cornstarch dissolves completely and there are no lumps hiding in the corners. Place the pan over medium-low heat and keep stirring constantly—this is not a moment to multitask. You'll feel the mixture gradually thicken over 2–4 minutes until it coats the back of your spoon like a silky curd. Once it's thick and glossy and vibrant orange, pull it off the heat and let it cool completely. This curd-like texture is exactly what you want; if it starts to look lumpy, you've overcooked it, and you'll need to whisk it smooth or start again.
- Prepare your workspace:
- Preheat your oven to 350°F while you work on the cake batter. Get your 9-inch loaf pan and line it with parchment paper, leaving generous overhang on the sides. This makes removal infinitely easier later. Grease the pan before adding the parchment so everything stays in place.
- Mix the dry ingredients:
- In a medium bowl, whisk together your flour, baking powder, baking soda, and salt until they're evenly distributed. Set this aside and don't touch it until you're ready for it—pre-mixing ensures no clumpy baking soda pockets will surprise you in the finished cake.
- Cream butter and sugar:
- In a large bowl, beat your soft butter and sugar together on medium speed for 3–4 minutes. You're looking for the mixture to become pale, almost fluffy, with a texture like frosting. This process is called creaming, and it's where a lot of the cake's structure comes from. When you lift the beaters, you should see little peaks form. Take a moment to really listen to the mixer; when it stops sounding labored and starts sounding almost whispery, you're there.
- Add eggs one at a time:
- Crack one egg into the butter mixture and beat for about 30 seconds until it's fully incorporated and the mixture looks homogeneous again. Repeat with the second egg. Scrape down the bowl between additions to make sure everything is truly combined. This might seem repetitive, but each egg needs a moment to fully emulsify into the butter or your batter will look broken and curdled.
- Stir in vanilla:
- Add your vanilla extract and give it one more quick mix to distribute evenly.
- Alternate flour and milk:
- Now switch your mixer to low speed. Here's where patience matters most: add a third of your flour mixture and mix just until you see no white streaks. Then add a third of your milk and mix gently until combined. Repeat with another third flour and another third milk, then finish with the final third of flour. The entire time, you're thinking: stop as soon as you can't see dry ingredients. Overmixing at this stage develops gluten, which makes the cake tough and dense instead of tender and soft. Your finished batter should be thick, smooth, and pale yellow—nothing lumpy, nothing overmixed.
- Layer and swirl:
- Spoon one-third of your batter into the prepared pan, smoothing it into an even layer. Now comes the moment that makes this cake special: dollop half of your cooled cranberry swirl and half of your orange swirl in alternating spoonfuls over the batter. You're not stirring; you're swirling. Take a thin skewer or butter knife and gently draw it through the swirls in one direction, then turn the pan and draw it in the opposite direction, creating a loose spiral pattern. Don't over-swirl; remember that you want distinct ribbons of red and orange, not muddy purple. Repeat with another third of the batter, then the remaining swirls, finishing with the final layer of batter on top. On that top layer, create a beautiful spiral pattern that you'll see when the cake is sliced—this is your moment to make it look impressive.
- Bake with confidence:
- Place the pan in the center of your oven and bake for 50–60 minutes. Start checking at 50 minutes with a toothpick; when inserted into the center, it should come out clean or with just a few moist crumbs—never with wet batter clinging to it. If your top is browning too quickly and the cake still feels jiggly in the center, tent it loosely with foil after 35 minutes. You'll know it's done when the top is golden brown, the edges have pulled slightly from the sides of the pan, and your kitchen smells like a citrus orchard in December.
- Cool properly for perfect swirls:
- Remove the cake from the oven and let it rest in the pan on a wire rack for 15 minutes. This resting period lets the cake set just enough to hold its shape. Then, use your parchment overhang to lift the whole cake from the pan and transfer it to the cooling rack. Here's the important part: let it cool completely before slicing. I know you're eager to see those swirls, but cutting into a warm cake will cause the interior to compress and the swirls to blur together. Patience here is what separates a beautiful slice from a jumbled one. Once it's completely cool, use a sharp serrated knife—dip it in hot water and wipe it dry between each slice—for clean, defined cuts that show off your handiwork.
 Save
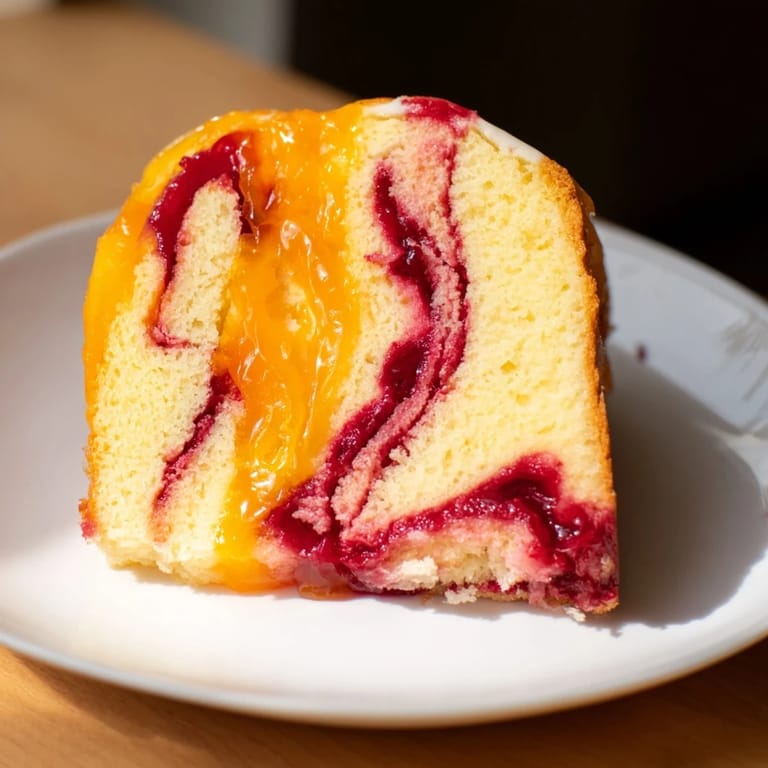
Save Last Christmas, my mother-in-law took a slice of this cake to her bridge club, and three of her friends called me asking for the recipe before the week was out. She told me later that when she cut into it at the table, the room went quiet for a moment—everyone just stared at the swirl before anyone took a bite. That's when I knew this recipe was special.
Why Swirling Matters More Than You Think
The swirl isn't just decoration; it's the entire personality of this cake. When you're gentle with the swirling motion, you preserve the distinct layers of flavor and color, creating contrast that makes each bite feel intentional. The slight undercooking of the swirl mixtures is also crucial—they need just enough body to hold their shape in the batter but not so much that they become stiff. Think of them as ribbons rather than frosting. When you swirl, you're creating little pockets of fruity flavor throughout the cake that burst with tartness against the soft vanilla crumb.
The Science of Tender Cake
What makes this cake stay moist for days is the ratio of fat to flour and the addition of milk, which creates steam during baking and locks in moisture. The butter creates richness, while the milk ensures tenderness. Overbaking by even five minutes will dry it out, so err on the side of slightly underdone—that toothpick test is your best friend. The crumb will continue to set as it cools, but the interior will stay tender and moist. This is also why cooling completely before slicing matters; the interior is still setting, and cutting into warm cake compresses the crumb, making it denser than it should be.
Variations and Moments of Joy
I've made this cake a hundred ways since that first time, and it never disappoints. Some years I use lemon zest instead of orange for a tangier edge, especially when I'm serving it alongside rich desserts. Other times, I've added a drop of natural food coloring to make the swirls even more dramatic—deep magenta cranberry and almost-neon orange for parties. Frozen cranberries are honestly better than fresh because they break down more evenly, so don't feel like you need to hunt for fresh ones in winter. And here's something I discovered entirely by accident: if you have leftover cranberry swirl, it makes an incredible topping for yogurt or ice cream the next morning.
- Try substituting lemon for orange if you want a tangier, more sophisticated flavor profile.
- Natural food coloring added to either swirl makes the colors even more vivid and photography-worthy.
- Freeze individual slices wrapped in plastic wrap for up to two months—they thaw beautifully at room temperature in about 30 minutes.
 Save
Save This cake has become my answer to the question, 'What should I bring?' because it's beautiful enough for celebrations and humble enough for ordinary Tuesdays. Make it once, and it'll become part of your baking story too.
Recipe FAQ
- → How are the cranberry and orange swirls prepared?
The cranberry swirl is simmered with sugar and water until thick and glossy, then cooled. The orange swirl is gently cooked with juice, zest, sugar, and cornstarch until curd-like and vibrant, then cooled before use.
- → What technique creates the marbled swirl effect?
Alternating spoonfuls of cranberry and orange mixtures are gently swirled through thirds of the cake batter using a thin skewer or knife, forming loose spiral patterns without over-mixing.
- → How do I prevent the swirls from bleeding together during baking?
Ensure both fruit mixtures are thick and fully cooled before swirling into the batter, then swirl gently to maintain distinct, vibrant ribbons of color.
- → What indicators show the cake is done baking?
The top should be golden with edges pulling slightly from the pan, and a toothpick inserted in the center should come out clean or with a few moist crumbs.
- → Can this cake be stored or frozen safely?
Store wrapped at room temperature for up to 2 days or refrigerate up to 5 days. Wrap individual slices tightly for freezing up to 2 months and thaw before serving.
- → Are there variations to enhance the swirl colors?
Adding a drop of natural food coloring to the fruit purees can brighten the swirl tones without altering flavor.